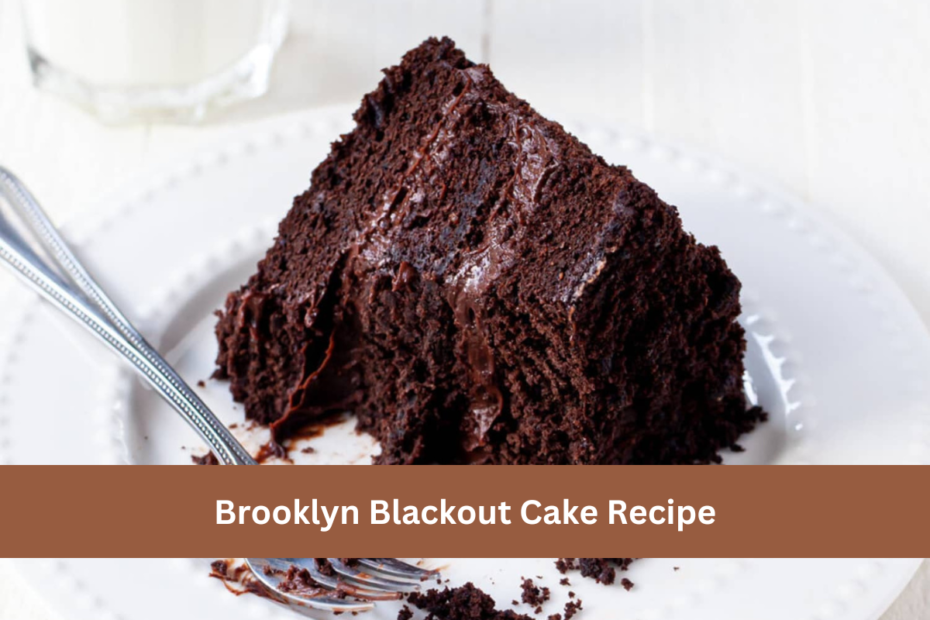
Brooklyn Blackout Cake Recipe: It is said that this exquisite chocolate cake was initially produced by Ebinger’s bakery in Brooklyn, New York, and that it was called after the blackout exercises that were conducted during World War II. This information comes from the widespread Internet. To recreate it, we discovered that patience is essential: the nicest texture was achieved by allowing all of the individual components to chill for a sufficient amount of time.
Brooklyn Blackout Cake Recipe
Ingredients
CAKE
- Unsalted butter, room temperature (for pans)
- ¾ cup Dutch-processed cocoa powder, plus more for pans
- 1½ cups all-purpose flour
- 1½ teaspoons baking soda
- ¾ teaspoon baking powder
- 1 large egg, room temperature
- 1 large egg yolk, room temperature
- 1½ cups (packed) dark brown sugar
- ¾ cup sour cream, room temperature
- 5 tablespoons vegetable oil
- 2 teaspoons vanilla extract
- ¾ teaspoon kosher salt
PUDDING AND ASSEMBLY
- ⅓ cup Dutch-processed cocoa powder
- 5 tablespoons cornstarch
- 1¼ cups heavy cream
- 4 large egg yolks, beaten to blend
- 1¼ cups whole milk
- ⅔ cup (packed) dark brown sugar
- ¼ teaspoon kosher salt
- 4 ounces milk chocolate, chopped
- 1 teaspoon vanilla extract
FROSTING
- 1 cup heavy cream
- 3 tablespoons golden syrup (such as Lyle’s Golden Syrup)
- ⅛ teaspoon kosher salt
- 12 ounces bittersweet chocolate, chopped
- ¾ cup sour cream, room temperature
- 2 tablespoons unsalted butter, room temperature
Preparation
CAKE
- Place a rack in the middle of the oven and preheat it to 350 degrees. Using parchment paper, line two round cake pans that are 8 inches deep and 2 inches wide. Apply butter to the surface, then dust with cocoa powder, making sure to remove any excess.
- Using a whisk, combine the flour, baking soda, baking powder, and the remaining half cup of cocoa powder in a medium bowl. Sift the ingredients together carefully. In order to achieve a smooth consistency, whisk together the egg, egg yolk, brown sugar, sour cream, oil, vanilla, salt, and half a cup of boiling water in a large bowl. The dry ingredients should be whisked in until they are just mixed.
- Distribute the batter evenly among the pans that have been prepared. A cake should be baked for 25–35 minutes, or until a tester put into the center of the cake comes out clean. Wait for the cake to cool completely in the pan before transferring it to a wire rack. Turn over onto a plate, and then turn it over once more.
- You can bake the cake two days in advance if you want to. Keep at room temperature with the wraps securely wrapped.
PUDDING AND ASSEMBLY
- Using a whisk, combine the cornstarch and cocoa powder in a large pot. After whisking in the cream, make sure there are no lumps left. Combining the egg yolks, milk, brown sugar, and salt using a whisk is the next step. Over medium-high heat, bring to a boil while stirring the mixture occasionally, and then reduce the heat to a low setting. Whisk continuously for one to two minutes, or until the mixture becomes thick and smooth.
- Take the liquid off the heat and start whisking in the vanilla extract and chocolate until the chocolate has melted and the mixture is smooth. This should be strained into a medium bowl using a sieve with a fine mesh. In order to avoid a skin from forming on the surface of the hot pudding, cover it with plastic wrap and press it immediately onto the surface. Chill for at least two hours, or until it is completely cold.
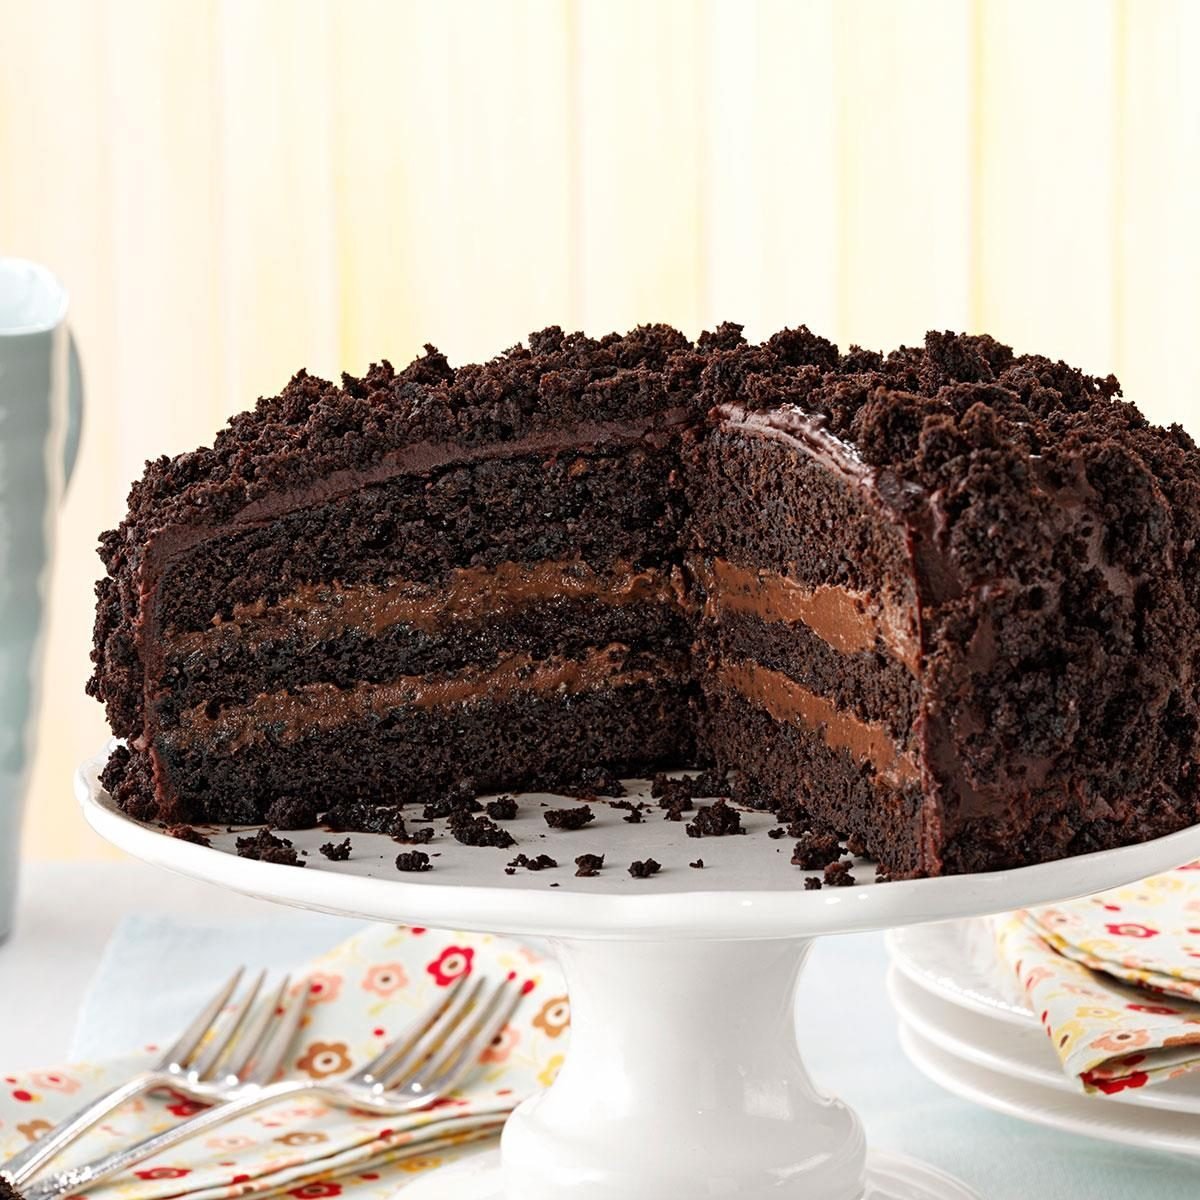
- You should gently cut cakes in half lengthwise using a knife with a serrated edge and sawing in long, equal strokes. Assemble the three layers that are the most attractive to you. The remaining layer should be crumbled into tiny crumbs using your fingers, or it can be pushed through a wire rack that has been placed inside of a rimmed baking sheet. Using a platter or cake stand, arrange one layer with the sliced side facing up.
- Whisk the pudding vigorously until it is smooth after removing the plastic from the refrigerated pudding. To distribute half of the pudding over the cake layer that is on the stand, use a rubber spatula and spread it all the way to the edges. With the cut side facing down, place another layer of cake on top, and then distribute the remaining pudding over the cake. Place the third cake layer on top, cut side down (but leave the top uncovered). Prepare the pudding by chilling the cake for one hour and up to eight hours.
- Pudding can be prepared one day in advance if you want to. Maintain a cool temperature.
FROSTING
- A large saucepan heated over medium-high heat should be used to bring the cream, syrup, and salt to a boil. When the mixture is removed from the heat, stir in the butter, sour cream, and chocolate. While stirring the mixture occasionally, allow it to sit until the chocolate and butter have melted, the mixture has become smooth, and there are no white streaks left. Transfer to a bowl of medium size. At the beginning, the frosting will have the appearance of a broken chocolate sauce; but, after approximately one and a half hours, it will begin to acquire a thicker consistency and become spreadable. Allow the frosting to sit at room temperature, stirring it approximately every thirty minutes. Stir until the mixture is completely smooth. (If the temperature in your kitchen is higher than 72 degrees, cool the frosting for five minutes. Continue to chill for an additional five minutes after stirring to mix the heated center with the chilly outside edges. The consistency should be similar to that of sour cream; if it is not, chill it for an additional five minutes and stir it.
- Frosting should be spread evenly around the top and sides of the chilled cake. It is feasible for the frosting on top to be as smooth and even as possible; however, it is acceptable for the sides to appear untidy because the crumbs will conceal any mistakes that you make.
- Stack the cake stand on top of a sheet carrier. Cake crumbs should be pressed into the sides of the cake using a handful of them. Repeat the process, rotating the cake as you go, until the sides are fully covered in crumbs. The top layer should have crumbs sprinkled on the exterior edges.
- Make Ahead: The cake can be put together one day in advance. Freeze in the open air.